引导垂直窗体、水平窗体、内联窗体

  1. 介绍和安装
  2. 网格系统
  3. 按钮、图标、表格
  4. 下拉列表和响应选项卡
  5. 进度条和Jumbotron

在本文中,我们将学习创建表单。几乎每个网站都使用表单,它们用于收集用户输入。

null

形式 : Bootstrap提供3种表单布局,即:

  • 垂直窗体(默认)
  • 水平形式
  • 内联表单
    我们将分别研究它们:

  • 垂直形式:

    首先,我们将使用

    标记初始化表单。我们将把所有标签和表单控件包装在标签

    中。这是模板组件之间的最佳间距所必需的。

    现在,我们可以根据需要在这些标签中设计表单。我们可以使用标签来定义输入元素的标签。请记住,

    例子:

    html

    <!DOCTYPE html>
    < html lang = "en" >
    < head >
    < title >Bootstrap Example</ title >
    < meta charset = "utf-8" >
    < meta name = "viewport" content = "width=device-width, initial-scale=1" >
    </ head >
    < body >
    < div class = "container" style = "color:green" >
    < h1 >GeeksforGeeks</ h1 >
    </ div >
    < div class = "container" >
    < h4 >Vertical Form</ h4 >
    < form action = "" >
    < div class = "form-group" >
    < label for = "id1" >User Name</ label >
    < input class = "form-control" type = "text" id = "id1" placeholder = "Enter your User Name" >
    </ div >
    < div class = "form-group" >
    < label for = "id2" >Password</ label >
    < input class = "form-control" type = "password" id = "id2" placeholder = "Enter your password" >
    </ div >
    < div class = "container" >
    < button type = "button" class = "btn btn-success" >Login</ button >
    < button type = "button" class = "btn btn-secondary" >Register</ button >
    </ div >
    </ form >
    </ div >
    </ body >
    </ html >
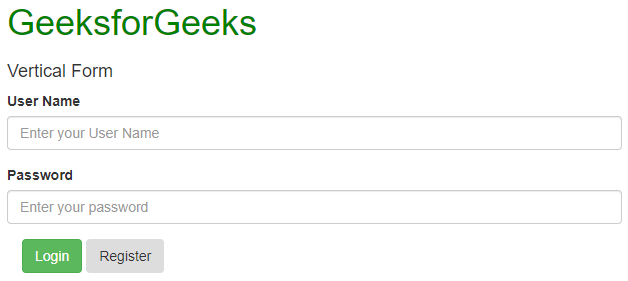


    输出: Bootstrap Buttons, Glyphicons, Tables

  • 水平形式:

    水平形式与垂直形式不仅在标记的数量上不同,而且在形式的表示上也不同。要使窗体水平,请在

    元素中添加class=“form horizontal”。如果要使用
  • 内联表单:

    顾名思义,在内联形式中,所有元素都是内联的、左对齐的,标签是并排的。只需在表单元素中添加class=“form inline”。

    使用class=“sr only”可以隐藏内联表单的标签,这有时可能会导致问题。

    也可以在表单中添加图标。为此,您必须添加class=“has feedback”,并在 标记之后添加glyphicon所在的span标记。还记得添加表单控件提要作为span标记的类吗。

    例子:

    html

    <!DOCTYPE html>
    < html lang = "en" >
    < head >
    < title >Bootstrap Example</ title >
    < meta charset = "utf-8" >
    < meta name = "viewport" content = "width=device-width, initial-scale=1" >
    </ head >
    < body >
    < div class = "container" style = "color:green" >
    < h1 >GeeksforGeeks</ h1 >
    </ div >
    < div class = "container" >
    < h4 >Inline Form</ h4 >
    < br >
    < form class = "form-inline" action = "/action_page.php" >
    < label for = "email" >Username:</ label >
    < input type = "email" class = "form-control" id = "email" placeholder = "Enter Username" name = "email" >
    < label for = "pwd" >Password:</ label >
    < input type = "password" class = "form-control" id = "pwd" placeholder = "Enter password" name = "pswd" >
    < button type = "button" class = "btn btn-danger" >Login</ button >
    < button type = "button" class = "btn btn-secondary" >Register</ button >
    </ form >
    </ div >
    </ body >
    </ html >


    输出: Bootstrap Buttons, Glyphicons, Tables

  • 支持的浏览器:

    • 谷歌浏览器
    • Internet Explorer
    • 火狐
    • 歌剧
    • 游猎

    文章作者 哈希特·古普塔 : harshit 总部位于加尔各答的Harshit Gupta是一位活跃的博主,对撰写时事、技术博客、故事和个人生活经历有着浓厚的兴趣。除了热爱写作,他还喜欢编码和跳舞。目前在IIEST学习,他是Geeksforgeks的活跃博客撰稿人。

    如果你也想在这里展示你的博客,请参见 吉微博 在Geeksforgek上写客博。

© 版权声明
THE END
喜欢就支持一下吧
点赞6 分享