在本文中,我们将讨论 工具提示 bootstrap提供的插件。工具提示对于显示网页中不同元素的描述非常有用。工具提示可以在网页中的任何元素上调用。 引导上的工具提示取决于第三方库 拴绳 用于定位。

因此,我们需要包括 拴绳min.js 之前 独自创立js
现在让我们来看一个工具提示的示例。

现在我们将检查 密码 这将生成上述工具提示
JAVA
<!-- Tooltip on a header --> <h3 data-toggle= "tooltip" title= "Hey! Tooltip here!" > Hover Over me to see a tooltip </h3> |
为了引入工具提示,我们将数据切换属性添加到元素中,并且需要使用jQuery初始化工具提示。
用于初始化工具提示的jQuery代码:
JAVA
<script> // jQuery code for initializing a tooltip $(document).ready(function () { // jQuery Attribute value selector to // select the specified element and // call the tooltip method on it $( '[data-toggle="tooltip"]' ).tooltip(); }); </script> |
我们甚至可以 定制 这个工具提示根据我们的要求,让我们探索一下定制工具提示的不同方式。
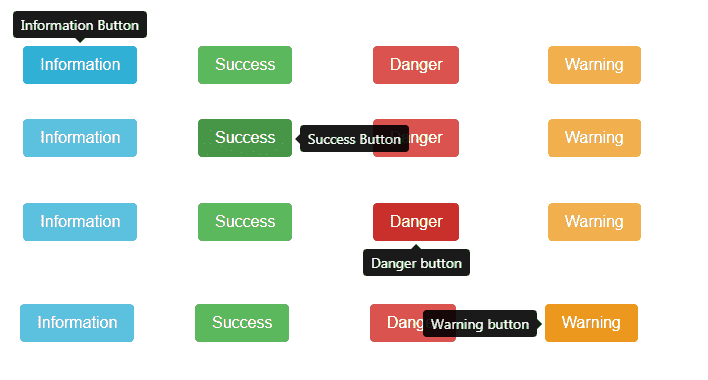
- 刀具尖端的放置 :我们可以在元素的顶部、底部、左侧和右侧放置工具提示。 例子:
密码 对于上述示例:
JAVA
<!-- Tooltips on simple buttons --><!-- Placement of tooltips --><divclass="row"style="margin:30px"><divclass="col-2"><button type="button"class="btn btn-info"data-toggle="tooltip"data-placement="top"title="Information Button">Information</button></div><divclass="col-2"><button type="button"class="btn btn-success"data-toggle="tooltip"data-placement="right"title="Success Button">Success</button></div><divclass="col-2"><button type="button"class="btn btn-danger"data-toggle="tooltip"data-placement="bottom"title="Danger button">Danger</button></div><divclass="col-2"><button type="button"class="btn btn-warning"data-toggle="tooltip"data-placement="left"title="Warning button">Warning</button></div></div>在上面的代码中,我们使用了 数据放置 属性为了设置工具提示的位置,我们还使用了 一行 和 上校 bootstrap提供的类 网格系统
- 工具提示中的Html :我们可以添加html作为tootip的内容。 例子:

密码 对于上述示例:
JAVA
<!-- Tooltip with html --><divclass="row"style="margin:40px"><button type="button"class="btn btn-warning"data-toggle="tooltip"data-placement="left"data-html="true"title="<h4>Hey!</h4><p>Tooltip with html</p>">Warning</button></div>在上面的代码中,我们使用了 数据html 属性,以便在工具提示中添加html。
- 工具提示的偏移量 :我们可以设置刀尖相对于目标的偏移。 例子:

密码 对于上述示例:
JAVA
<divclass="row"style="margin:40px"><button type="button"class="btn btn-warning"data-toggle="tooltip"data-placement="right"data-offset ="20 0"title="Don't click on Warning Button">Warning</button></div>在上面的代码中,我们使用了 数据偏移量 属性来设置属性
注: 下面所有代码的输出都是非静态的,因此这里不显示输出。
- 工具提示上的动画: 默认情况下,动画会添加到工具提示中,即它会淡入淡出。我们可以删除该动画。
JAVA
<!-- Removing animation from the tooltip --><divclass="row"style="margin:40px"><button type="button"class="btn btn-warning"data-toggle="tooltip"data-placement="right"data-animation="false"title="Don't click on Warning Button">Warning</button></div>在上面的代码中,我们使用了 数据动画 属性,并将其设置为false,以便从工具提示中删除动画
- 延迟出现和消失 :我们可以设置工具提示出现和消失的时间间隔。 我们可以通过两种方式设置延迟:
- 我们开始 相同的延迟时间 为了展示和隐藏
JAVA
<!-- Delay in tooltip --><divclass="row"style="margin:40px"><button type="button"class="btn btn-warning"data-toggle="tooltip"data-placement="right"data-delay="1000"title="Don't click on Warning Button">Warning</button></div>在上面的代码中,我们使用了 数据延迟 属性延迟分配给该属性的刀尖编号以毫秒为单位,即刀尖将延迟1000毫秒。
- 我们可以加上 不同的延迟时间 显示和隐藏刀尖的间隔。 Html代码:
JAVA
<!-- Delay in tooltip --><divclass="row"style="margin:40px"><button type="button"class="btn btn-warning"data-toggle="tooltip"data-placement="right"title="Don't click on Warning Button">Warning</button></div>html代码中没有任何更改。 jQuery代码:
JAVA
<script>$(document).ready(function (){// jQuery Attribute value selector$('[data-toggle="tooltip"]').tooltip({delay: {"show":1000,"hide":2000}});});</script>
- 我们开始 相同的延迟时间 为了展示和隐藏
- 触发刀尖 :我们可以添加一个触发工具提示的事件,默认情况下,工具提示在 盘旋并聚焦 “,允许的各种事件包括,-单击、悬停、聚焦和手动。
JAVA
<!-- triggering the tooltip --><divclass="row"style="margin:40px"><button type="button"class="btn btn-warning"data-toggle="tooltip"data-placement="right"data-trigger="click"title="Don't click on Warning Button">Warning</button></div>在上面的代码中,我们使用了 数据触发器 属性和值设置为 点击 ,这意味着当用户单击该元素时,将显示工具提示
有关bootstarp的不同元素,请参阅: 独自创立 参考: https://v4-alpha.getbootstrap.com/components/tooltips/ 本文由 苏米特·戈什 .如果你喜欢GeekSforgek,并想贡献自己的力量,你也可以使用 贡献极客。组织 或者把你的文章寄到contribute@geeksforgeeks.org.看到你的文章出现在Geeksforgeks主页上,并帮助其他极客。
如果您发现任何不正确的地方,或者您想分享有关上述主题的更多信息,请写下评论。
![关于”PostgreSQL错误:关系[表]不存在“问题的原因和解决方案-yiteyi-C++库](https://www.yiteyi.com/wp-content/themes/zibll/img/thumbnail.svg)