C++构建洞察力是一系列工具和API,可以帮助您对构建时间有更深入的理解。今天,我们将向您介绍这个工具箱中提供的一个特殊指标: 挂钟时间责任 (WCTR)。它可以用来估计构建中每个活动实际花费的时间,即使在存在并行性的情况下也是如此。我们首先描述如何使用 vcperf公司 . 然后,我们深入研究了一个实际案例,即使用度量来指导创建 预编译头 (PCH)对于 铜版画 开源项目。我们希望您能在自己的构建分析场景中找到WCTR的用法!
如何获取和使用vcperf
本文中的示例使用 vcperf公司: 一种工具,允许您捕获构建的跟踪并在 Windows性能分析器(WPA) . GitHub上提供了支持WCTR的最新版本。
1.按照以下步骤获取和配置 vcperf公司 和水渍险:
- 克隆 来自GitHub的vcperf存储库 . 确保已同步到源代码的最新版本。
- 打开
vcperf.sln在VisualStudio2019中创建解决方案文件,并为您选择的体系结构构建发布配置:x86或x64。选择与您的Windows版本相对应的体系结构。 - 这个 vcperf公司 您刚刚构建的可执行文件将在
outRelease{architecture}目录。 - 通过下载和安装 最新Windows ADK .
- 覆盖
perf_msvcbuildinsights.dll在您的WPA安装目录中的 vcperf公司 存储库。此文件是C++构建的见解WPA插件,它必须可用于WPA以正确解释由 vcperf公司 . 每次升级的版本时都必须覆盖此文件 vcperf公司 以确保兼容性。- 位置
perf_msvcbuildinsights.dll在你的 vcperf公司 存储库是:packagesMicrosoft.Cpp.BuildInsights.{Version}wpa{Architecture}. 使用与Windows版本相同的体系结构。 - WPA的安装目录通常是:
C:Program Files (x86)Windows Kits10Windows Performance Toolkit.
- 位置
2.按照以下步骤收集构建的跟踪:
- 打开提升的命令提示符并浏览到 vcperf公司 你刚造的。
- 获取您的版本的跟踪:
- 运行以下命令:
vcperf /start MySessionName. - 从任何地方构建您的C++项目,甚至从VisualStudio 2019内部构建 vcperf公司 收集系统范围内的事件)。
- 运行以下命令:
vcperf /stop MySessionName outputFile.etl. 此命令将停止跟踪,分析所有事件,并保存outputFile.etl跟踪文件。
- 运行以下命令:
- 打开你刚刚在WPA中收集的跟踪。
在WPA中访问WCTR度量
vcperf公司 将为构建中的每个活动(从编译器和链接器调用到模板实例化)提供一个WCTR值。为此,您可以在所有C++构建见解视图中找到一个挂钟时间责任列:构建资源管理器、文件、模板实例化和函数。如果您还不熟悉这些观点,请考虑通过阅读以下文章来提高自己的速度:
| 生成资源管理器 | 用C++构建洞察力寻找构建瓶颈 |
| 文件夹 | 用C++构建更快的PCH建议 |
| 模板实例化 | 用C++构建透视图模板元程序 |
| 功能 | 用C++构建洞察力提高代码生成时间 |
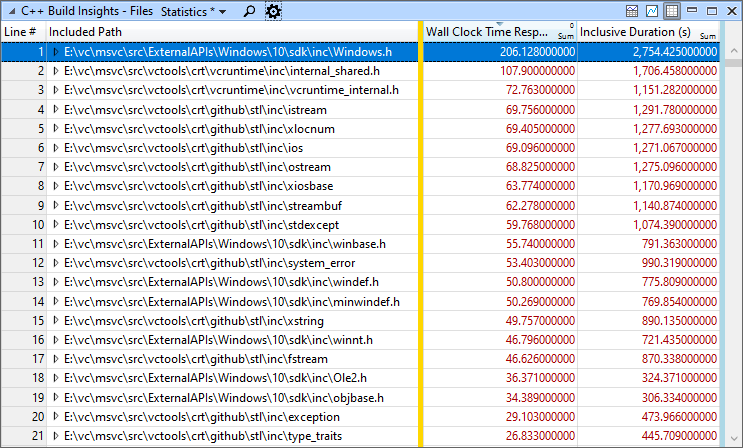
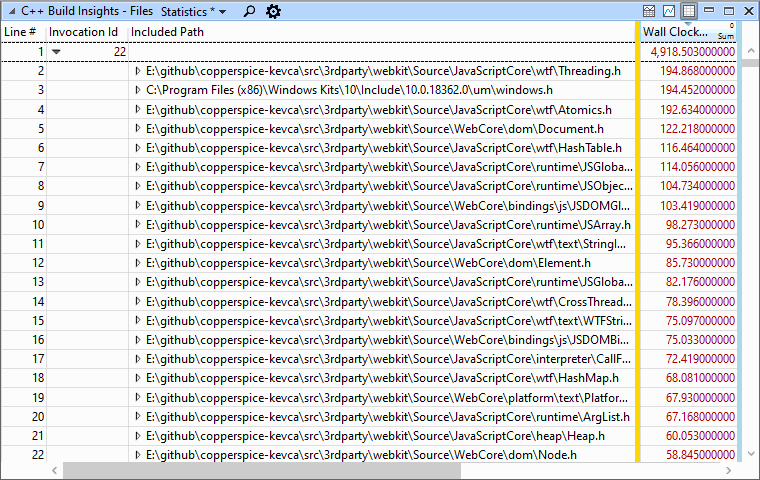
WCTR和WPA所做的聚合的结合使这个度量真正有价值。考虑一下 文件夹 视图如下所示。它告诉我们,总的来说,所有时间的累计持续时间 Windows.h 解析时间是2754秒。但是,整个构建的持续时间(图中未显示)约为2100秒,这毫无意义!现在的情况是,头文件同时在多个线程上被解析,在我们的聚合持续时间中增加了几秒钟,超出了物理上可能的范围。因此,2754值不能可靠地告诉我们,如果我们将 Windows.h a中的标题 PCH公司。另一方面,WCTR值考虑了构建并行性,以提供更现实的估计。在下面的示例中,我们可以看到预编译 Windows.h 会节省我们206秒的时间。
注: 在PCH中添加一个头文件,除了它自己的包含解析时间外,还可以节省时间。报头本身可以包括其他也成为PCH一部分的报头。如果在多个包含树中找到这些头,则会节省额外的开销。因此,WCTR度量往往低估了在PCH中添加头所节省的时间。尽管如此,它还是足够准确地指导你的决策。
案例研究:用WCTR指导铜版画PCH创作过程
在本案例研究中,我们使用WCTR度量来决定CopyPice代码库中的哪些C++项目应该使用PCH。我们继续制作一个简单的PCH,将总构建时间提高了12%。
如果您想按照以下步骤操作:
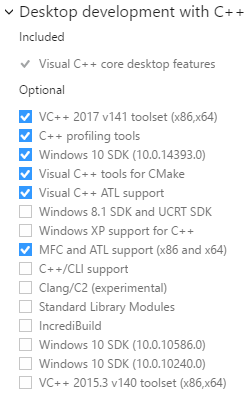
- 一定要有 克马克 已安装3.16或更高版本,并可在您的路径上使用。
- 为VS2019打开提升的x64本机工具命令提示符。
- 克隆 铜版GitHub存储库 去你喜欢的地方。
- 将目录更改为新克隆的存储库的根目录,然后运行以下命令:
git checkout 9a97793e0c9f. 这是用于下面的案例研究的提交。 - 运行以下命令:
mkdir build && cd build - 通过运行以下命令,使用CMake生成Visual Studio 2019解决方案:
cmake -G “Visual Studio 16 2019” -A x64 .. - 打开
copperspice.sln此文件是在build文件夹。 - 获取解决方案完整重建的跟踪:
- 在提升的命令提示符下,运行以下命令:
vcperf /start CopperSpice- 一定要使用 vcperf公司 从 vcperf GitHub存储库 . 这个 vcperf公司 visualstudio2019将只支持从下一个版本16.9开始的WCTR。
- 重建 x64版本 设备的配置
copperspice.slnVisual Studio 2019中的解决方案文件。 - 运行以下命令:
vcperf /stop CopperSpice copperspice.etl. 这将保存内建的跟踪copperspice.etl.
- 在提升的命令提示符下,运行以下命令:
- 在WPA中打开跟踪。
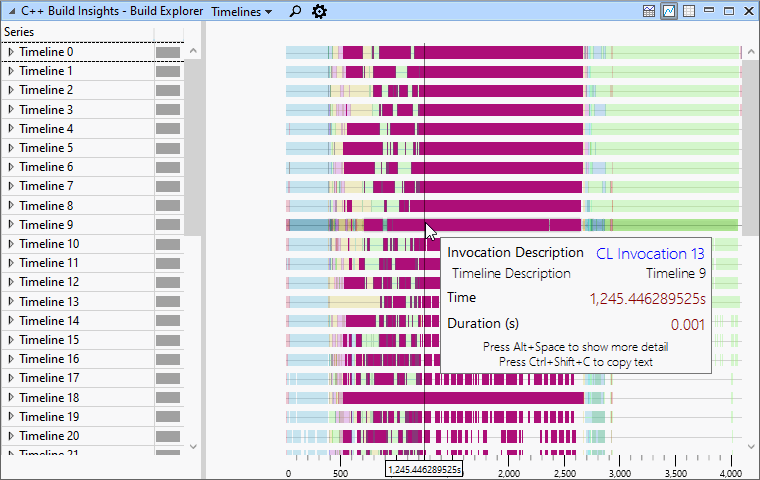
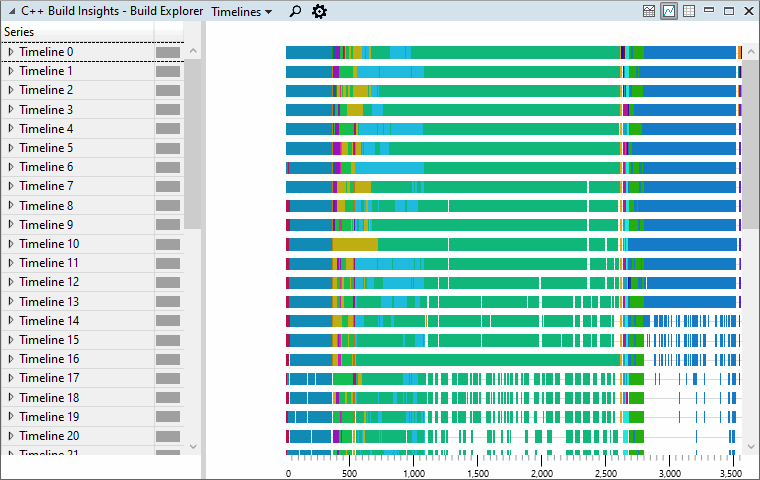
我们首先打开buildexplorer视图并将其设置为Timelines预设。我们注意到,根据视图底部的时间线,总构建时间大约为4050秒。我们还注意到有两个大的CL调用:一个在中间,一个在右边。他们的数字分别是13和21。
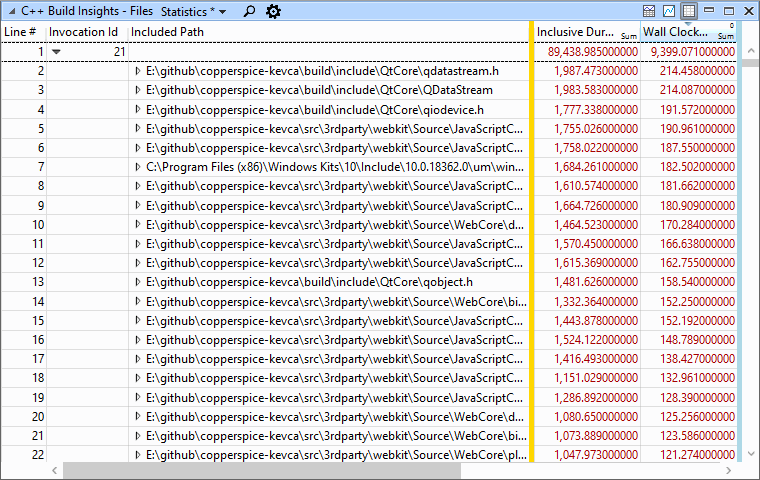
我们认为可能有机会使用PCH加速这些调用,因此我们打开Files视图并将其设置为Statistics预设。数据显示,实际上,我们构建中的很多时间都花在解析头上。

目前,Files视图告诉我们整个构建的头解析时间。我们想分别获得每个调用的解析时间细分。为此,我们使用WPA分组特性按调用ID对数据进行分组。
数据现在在调用21中显示了大量的头解析活动 qdatastream.h ,聚合的包含解析持续时间为1987秒。我们想知道预先编译这个头文件是否值得,所以我们看右边的Wall Clock Time Responsibility值。该字段指示214个挂钟时间秒。我们认为这一点非常重要,可以继续进行。
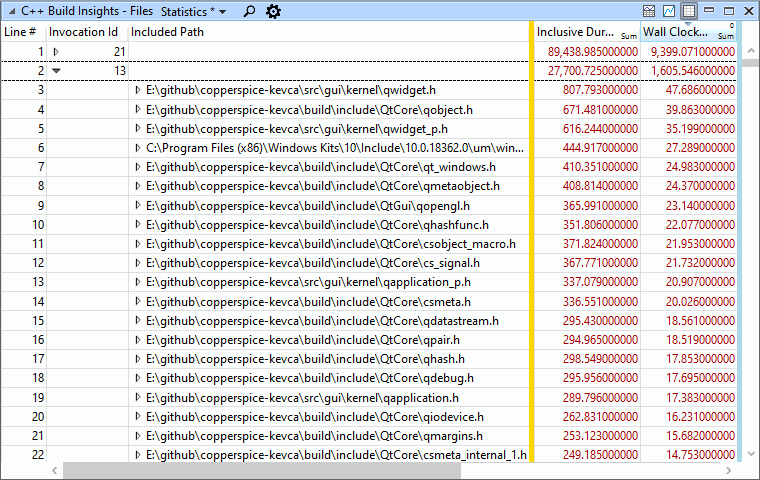
在开始创建PCH之前,我们还要查看调用13的数据 qwidget.h 可能会让我们误以为这是一个优秀的PCH候选人。然而,WCTR告诉我们,我们只能节省大约47秒。来自此调用的大多数其他头也具有较低的WCTR。考虑到这些信息,我们决定为调用13创建一个PCH暂时不值得。
我们想开始为调用21创建一个PCH,但是我们首先需要知道这个调用对应于哪个项目。我们切换回buildexplorer视图,但这次将其设置为Invocation Properties预设,以获取有关CL Invocation 21的更多信息 网络工具包 目录。
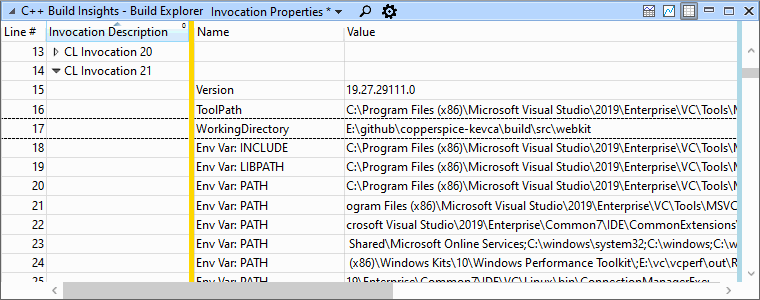
我们在铜版画存储库中查找,直到找到 网络工具包 项目。我们使用cmake3.16的PCH特性来配置要添加的项目 qdatastream.h 如我们之前发现的,这是调用21的顶部头 GitHub提交 看必要的改变。
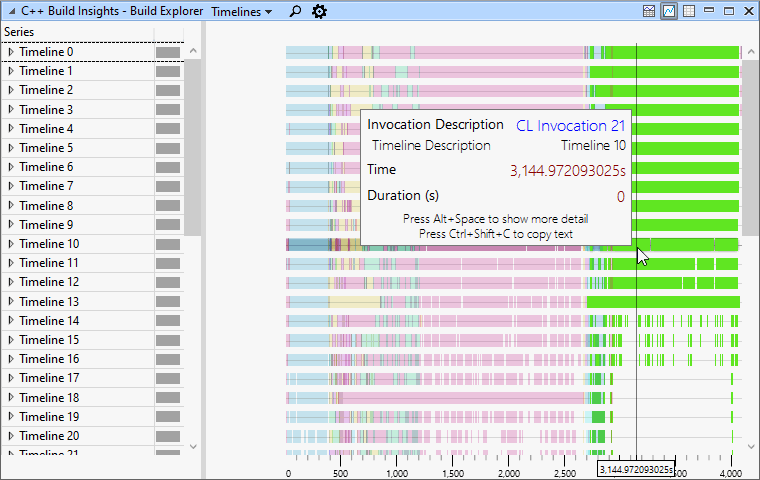
现在,我们已经为调用21创建了PCH,我们收集了一个新的跟踪,以便对 copperspice.sln 解决方案 x64版本 配置。完成后,我们在WPA中加载跟踪,并兴奋地调用buildexplorer视图。正如预期的那样,我们注意到CL调用的构建时间显著减少。我们新的总构建时间下降到了3550,提高了500秒,或者说12%。
我们还查看了Files视图,注意到CL invocation 22中的头解析时间减少了 qdatastream.h 标题。那是因为 qdatastream.h 对PCH影响的所有包含它或其子项的标头。现在我们有了一个更新的文件视图来显示这些效果,现在是选择第二个头继续PCH的好时机。就本案例研究而言,我们将到此为止。
注: 由于MSBuild的构建顺序不确定,我们上一个跟踪中的调用21变成了第二个跟踪中的调用22。
如果您一直在关注,您可能已经注意到,我们保存的500秒比预期的WCTR值214秒大 qdatastream.h . 正如本文开头所解释的,头文件的包含解析时间的WCTR值往往低估了PCH节省的时间。将头添加到PCH中通常会导致它包含的所有其他头也位于PCH中,从而节省额外的时间。可以使用 C++构建洞察力SDK 通过考虑文件包含图得出更精确的估计。我们将此作为练习留给读者…或作为未来文章的主题!
理解挂钟时间责任
挂钟时间责任是由以下整数定义的量:
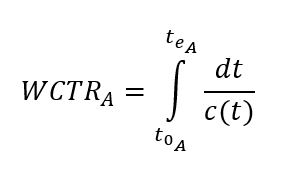
本公式中使用的符号如下所述:
| 世界贸易组织 | 活动A的挂钟时间责任。 |
| 托乌 | 活动A的开始时间。 |
| 特尤阿 | 活动A的结束时间。 |
| 碳(t) | 函数,表示在时间t时并发活动的数量。 |
如您所见,WCTR不同于简单的持续时间,因为它考虑了构建并行性。考虑下面显示的简单构建时间表。
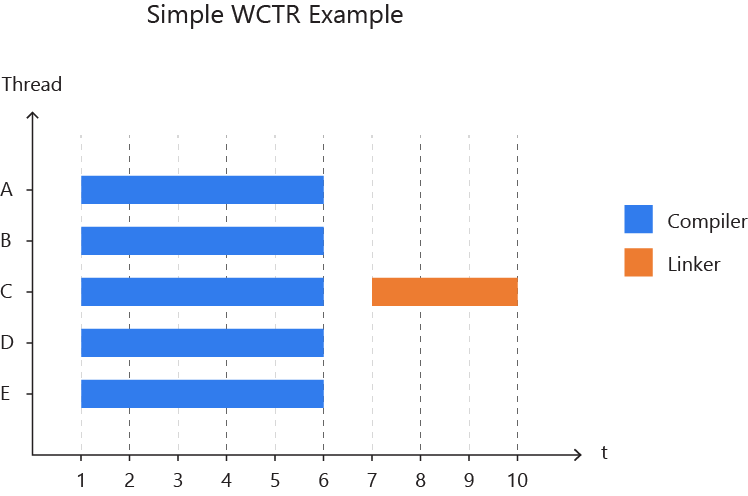
假设我们想知道编译这个版本需要多长时间。看看时间表,很容易看出我们等了5秒钟。但是如果我们看不到时间线,我们怎么计算这个值呢?我们不能把所有编译器的持续时间加起来,因为结果是25。这比构建本身要长,所以没有任何意义!
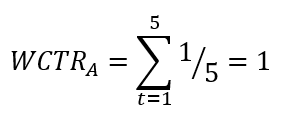
挂钟时间责任解决了这个难题,它假设每个编译器调用只负责构建中这个特定时间发生的其他事情的一小部分。在这个简单的例子中,每个编译器调用负责其持续时间的五分之一,因为总共有5个并发编译器同时工作。他们每个人都有一秒的挂钟时间责任。现在,将每个编译器的挂钟时间责任相加得到正确的值5。更正式地说,本例中每个编译器的挂钟时间责任使用以下公式计算:
真正的建设时间表从来没有这么简单!让我们考虑下面显示的稍微复杂一点的示例。
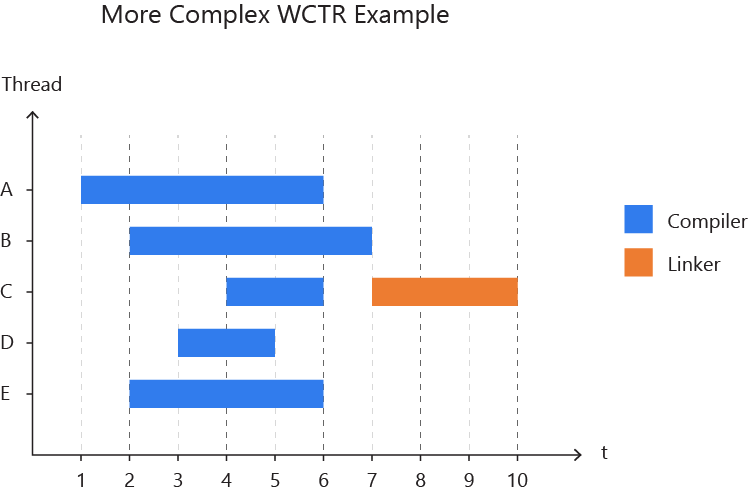
同样,简单地说,在这个构建中,我们在编译器上等待了6秒钟。但如果没有时间线的图像,我们怎么能得出这个值呢?当然,把他们的时间责任加起来!
在这种情况下,我们不能将每个编译器的持续时间除以5来获得它们的WCTR,因为并发编译器的数量会随着时间的推移而变化。取而代之的是,我们一秒一秒地进行计算,并将较小的结果相加。例如,线程A上编译器的WCTR使用以下公式计算:
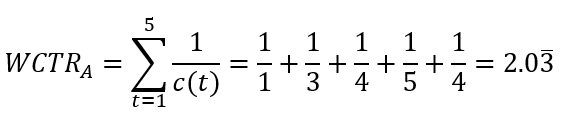
在第1秒和第3秒之间,只有一个编译器调用,所以我们除以1。在第2秒和第3秒之间,有3个并发编译器调用,所以我们除以3。我们继续这个过程,将每个结果相加,直到达到第2秒6,此时线程A上的编译器调用结束。如果您使用这个过程来计算所有5个编译器调用的WCTR,您将看到将它们的WCTR相加会得到正确的结果6。
告诉我们你的想法!
在本文中,我们分享了如何使用 vcperf和WPA . 我们希望您会发现这些信息很有用,并且它将使您更好地了解如何在构建中真正花费时间。
你有没有使用WCTR来调整你的构建?您是否编写了自己的应用程序,将此度量与 C++构建洞察力SDK ? 让我们知道在下面的评论,在Twitter上 (@VisualC) ),或通过电子邮件 visualcpp@microsoft.com .
![关于”PostgreSQL错误:关系[表]不存在“问题的原因和解决方案-yiteyi-C++库](https://www.yiteyi.com/wp-content/themes/zibll/img/thumbnail.svg)