这个 文件描述符 命令用于设置Linux操作系统的不同属性的限制。ulimit命令由所有流行的Linux发行版(如Ubuntu、Mint、Debian、CentOS、RHEL等)提供,因为它也是一个内核。在本教程中,我们将研究ulimit相关术语,如软限制、硬限制、为用户和组设置限制、设置进程限制、文件打开限制等 /垃圾箱 或 /usr/箱 它是bashshell提供的内置命令。
硬极限和软极限
在开始使用ulimit命令之前,让我们先讨论一下硬限制和软限制。ulimit命令使用术语硬限制和软限制。 硬限制 用于指定限制集,以防止给定属性传递给定值。这个 软限制 有时在比硬限制更软的时段可以绕过。
列出电流限制
在开始设置或更改不同内核和操作系统属性的限制之前,我们应该列出默认配置的当前限制。这个 -a 选项用于列出不同属性的所有当前限制,如“ 核心文件大小 ” , “ 数据分段大小 “等等。
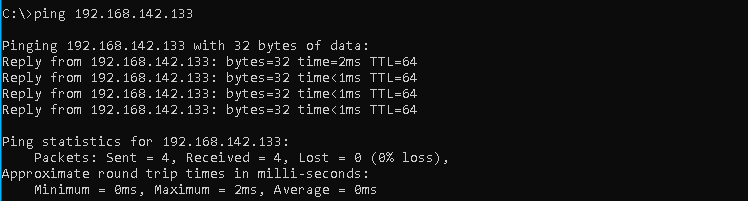
$ ulimit -a输出如下。
core file size (blocks, -c) 0data seg size (kbytes, -d) unlimitedscheduling priority (-e) 0file size (blocks, -f) unlimitedpending signals (-i) 15380max locked memory (kbytes, -l) 500491max memory size (kbytes, -m) unlimitedopen files (-n) 1024pipe size (512 bytes, -p) 8POSIX message queues (bytes, -q) 819200real-time priority (-r) 0stack size (kbytes, -s) 8192cpu time (seconds, -t) unlimitedmax user processes (-u) 15380virtual memory (kbytes, -v) unlimitedfile locks (-x) unlimited
![图片[1]-Linux ulimit命令教程及示例-yiteyi-C++库](https://www.yiteyi.com/wp-content/uploads/2020/11/linuxtect_image-1.png)
从这个配置中,我们可以看到核心文件的大小是0,这意味着我们不能为结束的进程创建核心转储。为了创建核心转储,应该使用ulimits文件的这个核心文件大小配置来增加核心转储的大小。
相关文章: 如何排除Rsync中的文件和目录?
创建核心转储
由于核心转储的默认配置设置为0,因此不会有关于中止或终止进程的核心转储。我们可以通过启用 -c 选项如下。我们可以指定无限制,以便设置大小无限制。
$ ulimit -c unlimited我们已将当前用户核心转储文件的限制设置为无限制。我们可以通过运行ulimit命令列出这个配置,如下所示。
$ ulimit -a限制最小值和最大值范围
ulimit命令将为指定的属性设置一些值。软限制在硬限制设置的地方具有最大值。软限值不能超过硬限值。硬限制和软限制的一般起始值为0。
limits.conf配置文件
ulimit相关的配置存储在名为 limits.conf . limits.conf文件位于 /etc/security/limits.conf文件 对于大多数Linux发行版。让我们来看看里面 极限.conf 配置文件。
# /etc/security/limits.conf
#
#Each line describes a limit for a user in the form:
#
#<domain>        <type>  <item>  <value>
#
#Where:
#<domain> can be:
#        - a user name
#        - a group name, with @group syntax
#        - the wildcard *, for default entry
#        - the wildcard %, can be also used with %group syntax,
#                 for maxlogin limit
#        - NOTE: group and wildcard limits are not applied to root.
#          To apply a limit to the root user, <domain> must be
#          the literal username root.
#
#<type> can have the two values:
#        - "soft" for enforcing the soft limits
#        - "hard" for enforcing hard limits
#
#<item> can be one of the following:
#        - core - limits the core file size (KB)
#        - data - max data size (KB)
#        - fsize - maximum filesize (KB)
#        - memlock - max locked-in-memory address space (KB)
#        - nofile - max number of open file descriptors
#        - rss - max resident set size (KB)
#        - stack - max stack size (KB)
#        - cpu - max CPU time (MIN)
#        - nproc - max number of processes
#        - as - address space limit (KB)
#        - maxlogins - max number of logins for this user
#        - maxsyslogins - max number of logins on the system
#        - priority - the priority to run user process with
#        - locks - max number of file locks the user can hold
#        - sigpending - max number of pending signals
#        - msgqueue - max memory used by POSIX message queues (bytes)
#        - nice - max nice priority allowed to raise to values: [-20, 19]
#        - rtprio - max realtime priority
#        - chroot - change root to directory (Debian-specific)
#
#<domain>      <type>  <item>         <value>
#

#*               soft    core            0
#root            hard    core            100000
#*               hard    rss             10000
#@student        hard    nproc           20
#@faculty        soft    nproc           20
#@faculty        hard    nproc           50
#ftp             hard    nproc           0
#ftp             -       chroot          /ftp
#@student        -       maxlogins       4

# End of file
在这个文件中,有关于为硬限制和软限制设置特定用户或组限制的不同示例。
相关文章: Linux apt更新和apt-dist升级教程
为用户设置限制
ulimit命令可用于为特定用户设置限制,其中该用户可以不同于当前用户。为了设置另一个用户的限制,我们需要sudo命令提供的root用户权限。在下面的示例中,我们将用户ismail进程计数设置为1000作为硬限制。
ismail hard nproc 1000为组设置限制
如果我们想为一组用户设置一个限制,我们可以使用Linux提供的组名。linux组名在/etc/groups文件中提供。我们还将在组名之前添加@符号,然后提供如下所示的组限制,这与用户限制非常相似。
@ismail hard nproc 1000限制进程计数
即使我们以前检查过进程计数的限制,我们也将学习如何为特定用户或组设置进程计数的限制。在下面的示例中,我们将进程的最大数目设置为 1024 对于名为 伊斯梅尔 对于名为 linuxtect公司 . 我们将提供 nproc公司 和 坚硬的 配置参数如下。
ismail hard nproc 1024@linuxtect hard nproc 1024限制打开的文件
限制的另一种流行情况是为当前打开的文件设置限制。这个 无文件 参数可用于设置打开的文件数限制。在下面的示例中,我们将打开的文件数限制设置为 1024 为用户服务 伊斯梅尔 和组 linuxtect公司 .
ismail      hard       nofile    1024
@linuxtect  hard       nofile    1024
![关于”PostgreSQL错误:关系[表]不存在“问题的原因和解决方案-yiteyi-C++库](https://www.yiteyi.com/wp-content/themes/zibll/img/thumbnail.svg)